The classic undergravel filter is probably the most overlooked aquarium filter out there, even more so than sponge filters. My local fish store operates over 300 tanks using only these filters. They work well, require little maintenance, and most importantly keep your tank cycled. So why are they rarely seen in 2024? Basically, it comes down to the more time-consuming set up, in addition to the fact that they do very little to polish the water.
So let’s talk more about how undergravel filters work, what they’re good for, and why they still hold up as a viable filtration option.
How Undergravel Filters Work
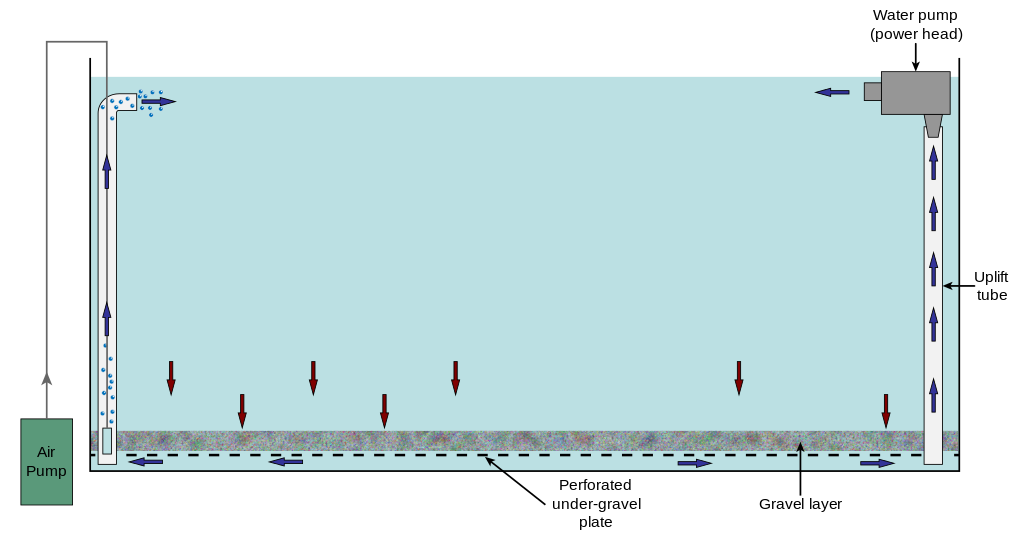
Under gravel filters work with the same principle as a sponge filter; Using an air pump or powerhead to create suction and water flow through the media. In this case, the media is your gravel or substrate. This can be a bit weird to understand at first but don’t overcomplicate it, we’re just pulling water through the gravel like any other filter pulls water through media. Because of this water flow, your tank’s biological cycle is in your gravel instead of a mechanical filter or sponge filter.
Like I mentioned before, undergravel filters do little in terms of water polishing and do nothing to remove colors and smells. However, if your tank is set up properly and receiving basic maintenance you should not have any bad odor or colors anyway.
Types of Undergravel Filters
There are a few different types of undergravel filters, but they all follow the same basic design described above. There are the standard kinds with a plastic plate and a single uplift tube with an air pump connection. These are good for small to medium-sized tanks.
Then you have your more advanced types that have multiple uplift tubes designed for powerheads instead of air pumps. When a powerhead is used instead of an air pump, the circulation is greatly increased. For this reason, powerheads are typically recommended for larger tanks and tanks with a heavy bioload because the air pump simply won’t create enough filtration. The more surface area your tank has, the more suction power you’ll need.
Benefits of Using Undergravel Filters
There are several advantages to using undergravel filters. For starters, you can even make your own using a tube and plastic egg crate panels. So it’s incredibly cheap to set up and even cost-effective in the long run because you aren’t replacing media like a traditional filter usually requires.
They provide an extensive amount of surface area for bacterial colonization, which breaks down toxic fish waste. Because your gravel is holding most of your beneficial bacteria, it can easily be transferred to other tanks to jumpstart or even instantly cycle them. Usually, it’s recommended to take some gravel from the established tank, place it into a filter bag, and then add it to your new tank filter.
Now here’s the big one for a lot of people, especially aquascapers. Other than a sump, under gravel filters are very low-profile and hideable. Some people hate sponge filters and mechanical filters (especially HOB) because they’re an eyesore to them and ruin the scenery of your tank. With undergravel filters, the tubes can be easily hidden behind decor or plants, and the main part of the filter is already hidden below your gravel.
Setting Up an Undergravel Filter with a Powerhead
Unless you’re setting up a really small tank, like a 5-gallon Betta tank, I would highly recommend using a powerhead instead of an air pump. While you can get away with an air pump a lot of the time, it simply does not create enough suction and circulation for my taste. I am not alone in this, most experienced aquarists will agree that powerheads are the way to go.
Setting up an undergravel filter with a powerhead is pretty simple. First, lay down your plate or egg crate on the bottom, and make sure it covers the entire bottom of the tank correctly. Next, add about 2 to 3 inches of gravel, medium to large-sized. Don’t use fine substrate like sand because it’ll be too hard for water to flow through. Pea gravel is preferred for undergravel filters so that water and oxygen can flow through. Make sure that your gravel is also evenly spread out so that there aren’t deeper pockets that create dead zones.
Lastly, simply add your powerhead to the top of your uplift tube and point it so the water is being sucked up and out of the tube. That’s it, it’s that simple!
Maintenance and Care for Undergravel Filters
Maintenance and care are pretty easy and straightforward, but still important. You’ll want to check regularly for signs of a clogged filter or reduced flow through the filter. One of the most important things to avoid if you have an undergravel filter is overfeeding. This causes the excess food to fall into the gravel, which creates clogs over time. When you’re doing water changes, use your vacuum to hover over the top of the gravel to suck up any debris on the surface. Once in a while, it’s okay to give your tank an actual deep vacuuming, however, do it in sections and not all at once. Doing this will allow the bacteria that was sucked out to recover. Doing it all at once is not a great idea, especially if your tank is heavily stocked.
Pros and Cons of Undergravel Aquarium Filters
So let’s lay out some pros and cons of using undergravel filters so that you can have a good idea about whether these filters are right for your setup.
Pros
- Cost-Effective: As we talked about before, besides the upfront cost of the filter and powerhead, there is basically no expense associated with it because there are no filter cartridges or anything like that.
- Simple to Use: Though it’s a little more work to set them up because they need to be buried in gravel, it’s very straightforward and not hard to do.
- Excellent Biological Filtration: Under gravel filters supply a significant amount of surface area for biological filtration.
- Low Maintenance: Aside from occasional gravel vacuuming and spot cleaning, these filters are super low maintenance compared to other types of filters.
- Aesthetic: Because the majority of the filtration involves your gravel, you can hide most of the filter for a more aesthetic look.
Cons
- Clogging Issues: If you don’t do basic maintenance, they are prone to getting clogged up, and it’s difficult to tell when there’s a clog.
- Limited Mechanical Filtration: These filters are designed for one thing; biological filtration, not mechanical filtration and water polishing. Therefore, they do very little in terms of removing colors, smells, and particles from the water.
- Unsuitable for Certain Setups: Undergravel filters are not appropriate for every setup. For example, these do not work well with planted tanks.
- Substrate Constraints: You are sort of limited on what substrate you can use. As I mentioned before, you can’t use fine sand because it won’t be able to create enough suction through it. Using pea gravel mixed with pumice is preferred.
In the end, undergravel filters are both a cost-effective and reliable option to filter an aquarium, especially if you run many tanks. They’re simple to set up and don’t require much maintenance at all. They’re great for beginners and experienced aquarists alike. So have a look at your setup, do some research into the other filters available, and decide if an undergravel will work for you.
References:
Figure 1:
Fred the OysteriThe source code of this SVG is valid. This vector image was created with Adobe Illustrator., CC BY-SA 4.0, via Wikimedia Commons